{
"cells": [
{
"cell_type": "markdown",
"id": "6df1fac8",
"metadata": {},
"source": [
":::{include} ../textbook-header.md\n",
":::\n",
"\n",
"## Portfolio websites help you document and share your work\n",
"\n",
"Why tell potential employers and collaborators what you can do when you can show them? In this activity, you will create a **personal portfolio webpage**. You'll use this webpage to share some biographical information and a photo of yourself. You can then update your webpage with links to work that you complete. \n",
"\n",
"***\n",
"\n",
"## Step 0: Create a GitHub account\n",
"Use **this link** to create a free GitHub account. \n",
"\n",
":::{warning}\n",
"If you already have a GitHub account, there is no need to create a new account!\n",
":::\n",
"\n",
"***\n",
"\n",
"## Step 1: Create a new repository\n",
"\n",
"Once you have a GitHub account, get started by creating a new **repository** for your webpage. There are several ways to accomplish this task. \n",
"\n",
":::{warning}\n",
"Sometimes buttons on GitHub are blue instead of green.\n",
":::\n",
"\n",
":::{admonition} What is a **repository**?\n",
":class: info margin\n",
"\n",
"A GitHub **repository** is a collection of code, documentation, and configuration files. All changes you make in a repository will be tracked using the version control system **git**. You can discuss and manage your project's work within the repository.\n",
":::\n",
"\n",
"To do this you can:\n",
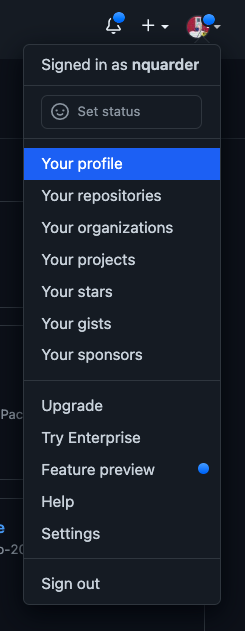
" 1. Navigate to your profile page\n",
" 2. Click on the dropdown arrow next to your profile photo in the upper right corner\n",
" 3. Select `Your profile`\n",
"\n",
" \n",
" \n",
" 4. Select the **Repositories** tab from the menu near the top of the page.\n",
"\n",
" \n",
"\n",
" 5. From here, you can select the green **New** button on the right to get started.\n",
"\n",
" \n",
"\n",
" 6. Customize the settings. You can name your repository anything short and descriptive. We recommend `.github.io` because it results in the simplest url for your website. You can also:\n",
" * Give your repository a **description**\n",
" * Make your repository **Public**\n",
" * You can skip adding the **gitignore** file for now\n",
" * Add a README if you like\n",
" * Choose a **License** for your repository, if you plan to keep any code in the repository. Check out choosealicense.com for more information about popular options.\n",
" * Once you're done, select the green **Create Repository** button at the bottom of the page\n",
"\n",
"\n",
":::{admonition} Speak Code\n",
":class: data-tip margin\n",
"\n",
"When reading code snippets, the `<` and `>` symbols are used to surround text you should replace with something applicable to you and your project. **Do not leave the `<` and `>` symbols in place!**. For example, in this case your repository name might look something like `jdoe.github.io`, if `jdoe` was your GitHub username.\n",
"::: \n",
"\n",
"***\n",
"\n",
"## Step 2: Create a new `index.md` file\n",
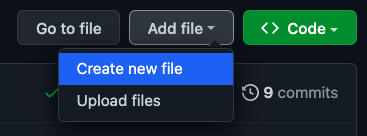
"You will create a new file called `index.md` that will serve as the content for your webpage. To do this you can :\n",
" 1. Select the **Add file** button from the menu on the right\n",
" 2. Select **Create new file**. \n",
"\n",
" \n",
"\n",
" 3. Name your new **Markdown** file `index.md`. This will make it the home page of your website. Then, add a **Markdown header** text to your index file, e.g. \n",
" ```{code-block}\n",
" # A fabulous Earth Data Science Portfolio\n",
" ```\n",
"\n",
":::{note}\n",
"\n",
"You can change this text to your name or something else. This is _**your**_ website, and you'll always be able to come back and make edits!\n",
":::\n",
"\n",
"***\n",
"\n",
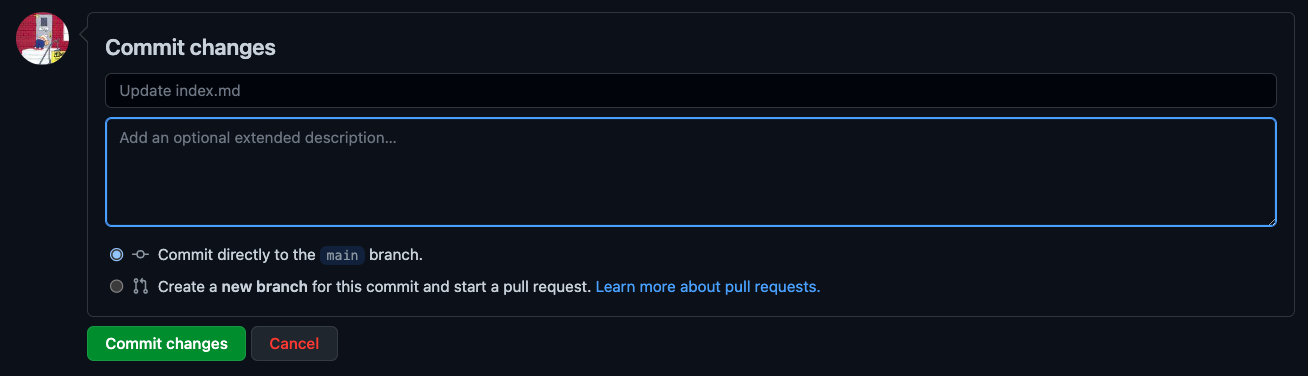
"## Step 3: Commit changes\n",
"Now that you've created your `index.md` file and added some text, you'll want to **commit changes** to your repository. Add an optional extended description of your changes and then select the green **Commit changes** button at the bottom of the page.\n",
"\n",
"\n",
"\n",
"***\n",
"\n",
"## Step 4: Build your webpage\n",
"Once you've created your `index.md` file you're ready to build your webpage. From your repository, select the **Settings** tab from the right end of the menu. \n",
"\n",
" \n",
"\n",
"From here, scroll down the menu on the **left** and select **Pages**.\n",
"\n",
"
\n",
"\n",
"From here, scroll down the menu on the **left** and select **Pages**.\n",
"\n",
" \n",
"\n",
"Now you'll want to select the **main** option under the **Branch** heading and then select **Save**.\n",
"\n",
"
\n",
"\n",
"Now you'll want to select the **main** option under the **Branch** heading and then select **Save**.\n",
"\n",
" \n",
"\n",
"***\n",
"\n",
"## Step 5: Check on your webpage\n",
"Check in on your webpage to see how it is doing by opening the link **`https://username.github.io/`** in a **new tab** in your web browser. Here, you'll need to replace `username` with your GitHub username. Once you see your name (or whatever text you added to your `index.md` file in **Step 2**) appear as a Markdown header, then you know your webpage is working!\n",
"\n",
"\n",
":::{note} \n",
"\n",
"Sometimes your webpage can take a minute or so to build so _be patient_ and refresh every 30 seconds or so until the page is done building. You can track the progress in the `Actions` tab.\n",
":::\n",
"\n",
"***\n",
"\n",
"## Step 6: Start adding information to your webpage\n",
"Now you're ready to start adding some more information to your webpage. Navigate back to your repository and open the `index.md` file that you just created. You will edit this page by clicking on the **pencil** icon on the right of the menu near the top of your repository page on GitHub. You will use **Markdown** and **Hypertext Markup Language (HTML)** to add text, links, images, and other content to your webpage. Markdown and HTML are both common markup langauges, and have wide application including formatting text, report writing, and website development.\n",
"\n",
"
\n",
"\n",
"***\n",
"\n",
"## Step 5: Check on your webpage\n",
"Check in on your webpage to see how it is doing by opening the link **`https://username.github.io/`** in a **new tab** in your web browser. Here, you'll need to replace `username` with your GitHub username. Once you see your name (or whatever text you added to your `index.md` file in **Step 2**) appear as a Markdown header, then you know your webpage is working!\n",
"\n",
"\n",
":::{note} \n",
"\n",
"Sometimes your webpage can take a minute or so to build so _be patient_ and refresh every 30 seconds or so until the page is done building. You can track the progress in the `Actions` tab.\n",
":::\n",
"\n",
"***\n",
"\n",
"## Step 6: Start adding information to your webpage\n",
"Now you're ready to start adding some more information to your webpage. Navigate back to your repository and open the `index.md` file that you just created. You will edit this page by clicking on the **pencil** icon on the right of the menu near the top of your repository page on GitHub. You will use **Markdown** and **Hypertext Markup Language (HTML)** to add text, links, images, and other content to your webpage. Markdown and HTML are both common markup langauges, and have wide application including formatting text, report writing, and website development.\n",
"\n",
" \n",
"\n",
"### Here you should think about adding the following information to your webpage:\n",
"* A **photo** of yourself\n",
"* Your name (as a _**header**_) if you haven't already\n",
"* A **bulleted list** of links to your public **contact information** (email, GitHub account, LinkedIn account, social media accounts, etc.)\n",
"* Your educational and professional background\n",
"* A **biographical paragraph** about yourself\n",
"* What you're **excited about learning** about **Earth Data Science**\n",
"* **Questions** that you'd like to answer using **Earth Data Science**\n",
"\n",
"\n",
":::{note}\n",
":class: margin\n",
"\n",
"You will want to review the **Markdown Basic Syntax guide** to help you format your webpage using **`Markdown`** and **`HTML`**. We also have a **lesson** in our **Earth Data Science** textbook that may be helpful.\n",
":::\n",
"\n",
":::{note}\n",
":class: margin\n",
"\n",
"> When adding **links** and **images** to your webpage, you may appreciate the added control of Hypertext Markup Language (HTML) over Markdown. \n",
":::\n",
"\n",
":::{warning} \n",
"\n",
"Always remember to **commit changes** so that your updated content gets added to your webpage.\n",
":::\n",
"\n",
"***\n",
"\n",
"## Step 7: Add website metadata and theme\n",
"\n",
"GitHub pages has some build in themes that you can use to make your website more attractive.\n",
"\n",
"To preview themes:\n",
" 1. Go to the GitHub theme page\n",
" 2. Click on the link to a theme you are interested in. This will take you to the theme **repository**.\n",
" 3. Scroll down in the repository until you see a link like \"preview what this theme will look like\" at the top of the README file (below the code).\n",
"\n",
"The `_config.yml` file that you created to add a theme can also be used to **change the title of your website from the default (the name of your repository)**. Check out the README for your theme to see what parameters are available For example, and example `_config.yml` file for the `minimal` theme looks like:\n",
"\n",
":::{code-block}\n",
"title: J. Doe's Awesome Portfolio Website\n",
"description: Check out my projects!\n",
"logo: img/headshot.png\n",
"remote_theme: pages-themes/minimal@v0.2.0\n",
"plugins:\n",
"- jekyll-remote-theme\n",
":::\n",
"\n",
":::{admonition} So what **is** YAML?\n",
":class: data-tip margin\n",
"\n",
"The `_config.yml` file is written in **YAML**, a human-readable format for structured information (lists and key/value pairs). Learn more about YAML on their website\n",
":::"
]
}
],
"metadata": {
"jupytext": {
"text_representation": {
"extension": ".md",
"format_name": "myst",
"format_version": 0.13,
"jupytext_version": "1.14.7"
}
},
"kernelspec": {
"display_name": "Python 3",
"language": "python",
"name": "python3"
},
"myst": {
"substitutions": {
"authors": "Nate Quarderer, Elsa Culler",
"excerpt": "GitHub is a powerful software development tool owned and operated by Microsoft. It is used almost universally for software development and scientific projects. It lets you:\n * Keep track of all the changes you have ever made, when, and why\n * Collaborate with others\n * Get your code online so you can access it anywhere\n * Use a cloud platform to run your code\n * Publish a website in minutes\nWe'll be focusing on that last feature in this activity, in which you will create and publish your own online portfolio website. You can read more about `git` and `GitHub` in our open **Earth Data Science** textbook.\n",
"objective": "* Sign up for a GitHub account, if needed\n* Create a GitHub repository\n* Publish a website using **GitHub pages**\n* Structure text and other content with **Markdown**\n* (optional) Use HTML to add additional features\n* (optional) Add a jekyll theme",
"title": "Create your own webpage using GitHub pages"
}
},
"source_map": [
31
]
},
"nbformat": 4,
"nbformat_minor": 5
}
\n",
"\n",
"### Here you should think about adding the following information to your webpage:\n",
"* A **photo** of yourself\n",
"* Your name (as a _**header**_) if you haven't already\n",
"* A **bulleted list** of links to your public **contact information** (email, GitHub account, LinkedIn account, social media accounts, etc.)\n",
"* Your educational and professional background\n",
"* A **biographical paragraph** about yourself\n",
"* What you're **excited about learning** about **Earth Data Science**\n",
"* **Questions** that you'd like to answer using **Earth Data Science**\n",
"\n",
"\n",
":::{note}\n",
":class: margin\n",
"\n",
"You will want to review the **Markdown Basic Syntax guide** to help you format your webpage using **`Markdown`** and **`HTML`**. We also have a **lesson** in our **Earth Data Science** textbook that may be helpful.\n",
":::\n",
"\n",
":::{note}\n",
":class: margin\n",
"\n",
"> When adding **links** and **images** to your webpage, you may appreciate the added control of Hypertext Markup Language (HTML) over Markdown. \n",
":::\n",
"\n",
":::{warning} \n",
"\n",
"Always remember to **commit changes** so that your updated content gets added to your webpage.\n",
":::\n",
"\n",
"***\n",
"\n",
"## Step 7: Add website metadata and theme\n",
"\n",
"GitHub pages has some build in themes that you can use to make your website more attractive.\n",
"\n",
"To preview themes:\n",
" 1. Go to the GitHub theme page\n",
" 2. Click on the link to a theme you are interested in. This will take you to the theme **repository**.\n",
" 3. Scroll down in the repository until you see a link like \"preview what this theme will look like\" at the top of the README file (below the code).\n",
"\n",
"The `_config.yml` file that you created to add a theme can also be used to **change the title of your website from the default (the name of your repository)**. Check out the README for your theme to see what parameters are available For example, and example `_config.yml` file for the `minimal` theme looks like:\n",
"\n",
":::{code-block}\n",
"title: J. Doe's Awesome Portfolio Website\n",
"description: Check out my projects!\n",
"logo: img/headshot.png\n",
"remote_theme: pages-themes/minimal@v0.2.0\n",
"plugins:\n",
"- jekyll-remote-theme\n",
":::\n",
"\n",
":::{admonition} So what **is** YAML?\n",
":class: data-tip margin\n",
"\n",
"The `_config.yml` file is written in **YAML**, a human-readable format for structured information (lists and key/value pairs). Learn more about YAML on their website\n",
":::"
]
}
],
"metadata": {
"jupytext": {
"text_representation": {
"extension": ".md",
"format_name": "myst",
"format_version": 0.13,
"jupytext_version": "1.14.7"
}
},
"kernelspec": {
"display_name": "Python 3",
"language": "python",
"name": "python3"
},
"myst": {
"substitutions": {
"authors": "Nate Quarderer, Elsa Culler",
"excerpt": "GitHub is a powerful software development tool owned and operated by Microsoft. It is used almost universally for software development and scientific projects. It lets you:\n * Keep track of all the changes you have ever made, when, and why\n * Collaborate with others\n * Get your code online so you can access it anywhere\n * Use a cloud platform to run your code\n * Publish a website in minutes\nWe'll be focusing on that last feature in this activity, in which you will create and publish your own online portfolio website. You can read more about `git` and `GitHub` in our open **Earth Data Science** textbook.\n",
"objective": "* Sign up for a GitHub account, if needed\n* Create a GitHub repository\n* Publish a website using **GitHub pages**\n* Structure text and other content with **Markdown**\n* (optional) Use HTML to add additional features\n* (optional) Add a jekyll theme",
"title": "Create your own webpage using GitHub pages"
}
},
"source_map": [
31
]
},
"nbformat": 4,
"nbformat_minor": 5
}